
|
|

Noosh Loves
Simple DIY Doily Bowls
Tina from Noosh
Date
Hi Baby-Biters! I'm Tina from Noosh and I'm so excited the lovely Jodi has asked me to write a guest post for you all! I've got an super easy and just as pretty craft project to share, but first let me tell you a little about me and Noosh. We are a new online retailer of kids furniture and decorator accessories in Australia. Run by me and my gorgeous and clever friend Sheridan - two ordinary mum's who met one day at mothers group in Sydney shortly after we had our first bubs. We share a background in magazines (Sheridan is a business and marketing guru, and I'm an art director and graphic designer). We got tired of not being able to find the kind of furniture we wanted for our kids spaces so we took the leap and made a range of products ourselves for kids whose mums want stylish, quality and affordable pieces in their homes. The Frankie modular sofas are the crowd favourite at the moment but we've got some more designs up our sleeve that we'll be releasing later this year. Come and visit us at our store or drop by the NooshLoves kids style blog for daily updates on pretty things, yummy recipes and fun and clever ways to entertain your wee ones. Now, the project...
As a lover of all things handmade, dainty and pretty, this easy DIY project ticks all the boxes for me! It's probably the easiest craft project you've ever seen, and the requirement of squidgy, messy hands makes it a big winner to do with kids...
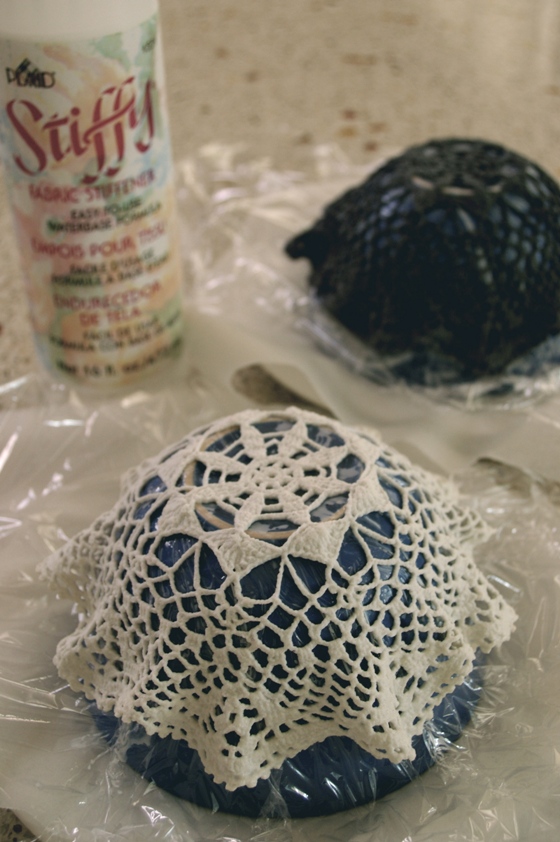
Step 1. Choose a bowl the shape and size you'd like your doily bowl to be, turn it upside down and cover it with plastic cling wrap.
Step 2. Saturate your doily with fabric stiffening solution (available from good craft stores for around $8). Be careful not to overdo it with the solution as it could fill in the holes in the pattern - better to recoat it when it's dry than to put it on too thick in one go.
Step 3. Lay the saturated doily over the base of your bowl and shape it the way you want.
Step 4. Leave to dry for about 12 hours.
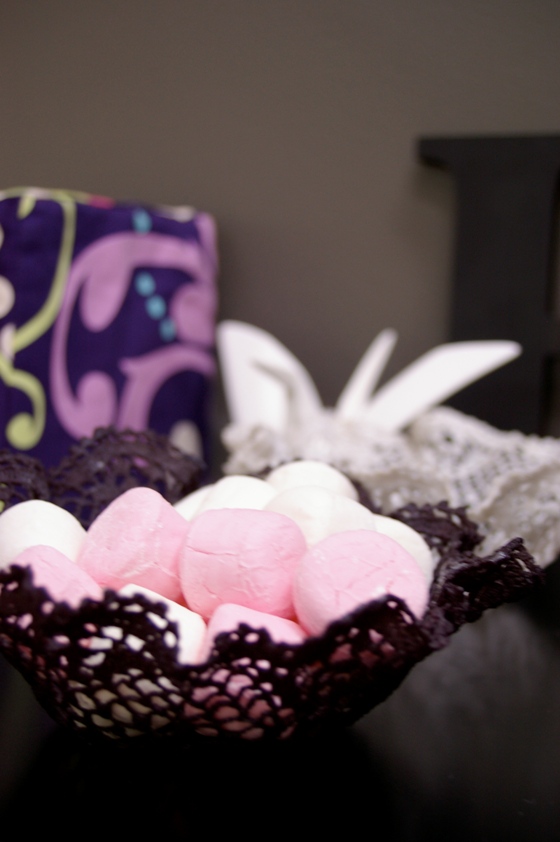
Step 5. Once dry, carefully pull it away from the bowl (you may have to get your fingers up in between the cling wrap and the bowl to release the hardened doily). Voila! Marshmallows optional.
I found my project needed more than one coat of the fabric stiffener, so I applied a second, lighter coat once it was dry and off the mould. If you decide yours needs a second application too, be careful the holes in your doily pattern don't fill up with solution. Good luck!
Tina from Noosh
Date
Hi Baby-Biters! I'm Tina from Noosh and I'm so excited the lovely Jodi has asked me to write a guest post for you all! I've got an super easy and just as pretty craft project to share, but first let me tell you a little about me and Noosh. We are a new online retailer of kids furniture and decorator accessories in Australia. Run by me and my gorgeous and clever friend Sheridan - two ordinary mum's who met one day at mothers group in Sydney shortly after we had our first bubs. We share a background in magazines (Sheridan is a business and marketing guru, and I'm an art director and graphic designer). We got tired of not being able to find the kind of furniture we wanted for our kids spaces so we took the leap and made a range of products ourselves for kids whose mums want stylish, quality and affordable pieces in their homes. The Frankie modular sofas are the crowd favourite at the moment but we've got some more designs up our sleeve that we'll be releasing later this year. Come and visit us at our store or drop by the NooshLoves kids style blog for daily updates on pretty things, yummy recipes and fun and clever ways to entertain your wee ones. Now, the project...
Simple DIY Doily Bowls
As a lover of all things handmade, dainty and pretty, this easy DIY project ticks all the boxes for me! It's probably the easiest craft project you've ever seen, and the requirement of squidgy, messy hands makes it a big winner to do with kids...
Step 1. Choose a bowl the shape and size you'd like your doily bowl to be, turn it upside down and cover it with plastic cling wrap.
Step 2. Saturate your doily with fabric stiffening solution (available from good craft stores for around $8). Be careful not to overdo it with the solution as it could fill in the holes in the pattern - better to recoat it when it's dry than to put it on too thick in one go.
Step 3. Lay the saturated doily over the base of your bowl and shape it the way you want.
Step 4. Leave to dry for about 12 hours.
Step 5. Once dry, carefully pull it away from the bowl (you may have to get your fingers up in between the cling wrap and the bowl to release the hardened doily). Voila! Marshmallows optional.
I found my project needed more than one coat of the fabric stiffener, so I applied a second, lighter coat once it was dry and off the mould. If you decide yours needs a second application too, be careful the holes in your doily pattern don't fill up with solution. Good luck!


advertisements


| 1. 10 candles to light your fire - how much fun can you fit on your cake?! 2. Hoopla kids - Scrumptious looking gears to brighten your kids' wardrobes 3. How to dress your child for a special occasion 4. Fruity pineapple flamingo party - Sweet, bright and sunny 5. Spanish Baby Bites- European sleeping bags that are unique and adorable |
|
|
| 1. Upcycling baby clothes - Turn your most treasured items into something that lasts 2. Grace's ballet party - celebrate your tiny dancer 3. After the birth - What to expect when you've welcomed your bundle of joy 4. Lalaloopsy party - How to craft your party around a centrepiece 5. 10 candles to light your fire - how much fun can you fit on your cake?! |
|
|
| 1. Scone peapods - the cutest and most delicious vegetables around 2. Lalaloopsy party - How to craft your party around a centrepiece 3. Superkids Scroggin- An innovative lunchbox idea 4. Jeffrey's Lego Party - totally Legotastic 5. Best indoor playsets - Unbelievable fun most of us can only dream of! |